Tuesday, August 15, 2017

BJJ Advice From Rickson Gracie: Grapplers Must Also Learn to Strike

BJJ Advice From Rickson Gracie: Grapplers Must Also Learn to Strike
To be a well-rounded fighter, you must possess the ability to strike and grapple. Using punching to complement your grappling and ground-fighting skills is very important. In fact, it is necessary to have a background in striking if you wish to excel in MMA fighting events.
For instance, if you’re a grappler and you want to be able to close the distance between yourself and your opponent, you must understand how to strike. A good sense of timing is especially important for you to develop. You must be able to judge the potential danger of the movements of your opponent. Knowing the right time to block a technique and avoid taking punishment from your opponent’s blows is also a product of good timing.
Download “4 Submission Escapes From Jean Jacques Machado: Brazilian Jiu-Jitsu Tactics for Escaping and Reversing” now! Start by clicking here.
(Brazilian jiu-jitsu instructor Rickson Gracie, above left)
If you are competing in a wrestling match, you might not need to have this type of understanding of timing, especially while you and your opponent are on your feet. But to succeed in MMA competition, you absolutely must have mastered this element of fighting. That will enable you to shoot in for a takedown and totally avoid the punishment your striking opponent will try to inflict as he struggles to avoid being taken to the ground.
Go here now to read “Rickson Gracie: Classic Q&A With the Legend of Brazilian Jiu-Jitsu.” 
When a fight goes to the ground, I find that being on the bottom and holding my opponent in my guard is very advantageous for many reasons, including the striking possibilities it presents. There are many things I can do on the ground, and I can formulate a strategy there. Striking can mean much more than just punching with my fist. Punching constitutes only about 15 percent to 20 percent of the possibilities. The rest are knee strikes, head butts and elbow strikes. All these techniques are important to know because you must consider the damage that can be done to your knuckles when you execute too many strikes with your fists.
When it comes to MMA fighting, I would much rather look for an opening for an effective grappling move than focus on just hurting my opponent with some type of strike. I always look for the possibility of employing a submission technique, and I always try to defeat my opponent in the most humane way possible, without any unnecessary violence. I don’t think martial artists must focus on violence when they compete, and one way to avoid that is to choose a submission technique over a striking technique.
In any encounter, it is good to be as gentle as possible.
by Rickson Gracie   June 15, 2015

Black Belt Magazine

Monday, August 14, 2017

The Push Kick Can Add Speed and Power to Your Taekwondo Tool Box

Ultimate Kicking: The Push Kick Can Add Speed and Power to Your Taekwondo Tool BoxAs the quality of the competition and techniques seen in taekwondo continues to improve, the push kick is emerging as one of the most potent weapons used by today’s martial arts athletes.
“It works for anyone,” says Yeon Hwan Park, coach of the 1988 U.S. Olympic team and head coach of the 1991 Pan-American Games team. “If timed properly, the push kick can be a devastating maneuver. It allows a competitor to get maximum power from his kick, enabling him to use his leg reach and strength to his maximum ability. Competitors are discovering this more and more.”
As a result, Park says, practitioners are developing innovative ways to employ this powerful technique.
Ideally, the push kick will make contact with the heel, but the ball of the foot also works, the author says.
“The push kick combines thrust with snap,” Yeon Hwan Park says. “If done at the right time, you can combine the force of your opponent’s attack with a great deal of your own body’s power.” That results in a powerful kick, but it must be refined through practice.
To throw a taekwondo push kick, lift the knee of your rear leg to your chest. Slide your supporting leg forward as you do, then shoot out your kicking leg in a piston-like fashion. Try to land your foot directly on your opponent’s chest or face. Ideally, you should strike with your heel, but if distance doesn’t permit, the ball of your foot can suffice.
Park suggests several drills to develop your technique and timing. One involves squaring off with an opponent in closed cover (chests facing opposite directions). As he attempts an ax kick, you aim for his solar plexus with your push kick. If timed right, your kick will land him on his back.
“If you wait until his ax kick is at its highest point, it’s too late to start a counterstrike,” Yeon Hwan Park says. “As he begins his motion, you must begin yours. Don’t wait, especially in a situation like this when your face is exposed.”
He recommends another drill to illustrate how a push kick can repel an attempted back kick. “Once your opponent turns his back, thrust a push kick into the area just above his waist,” he says. If done properly, the push kick will stop the back kick before he can complete the required turning motion. Park advises students to follow up with a roundhouse kick.
In repelling a back kick, a push kick works especially well when done off the front leg, Yeon Hwan Park says. “You don’t need to thrust it in with any great amount of power. If you keep your leg and foot straight, you can practically lift your foot up and just place it on his waist as he turns into the kick. Since he’s moving into your leg, there will be sufficient force without your having to do much except stay ready to follow up.”
Again, Park emphasizes that you must time the kick so it’s unleashed concurrently with the attacker’s kick. “If you start your kick when he starts his, your foot should be in position to cut off the back kick, then follow up,” he says. “If you’re late with the push kick, you’re going to run into a back kick, which is probably the most powerful technique in taekwondo. Your kick should land at or just above his hip. Once you’ve stopped his momentum, he’s a sitting duck.”
For the next drill, square off with your partner in open cover (chests facing the same direction). As he unleashes a rear-leg roundhouse, skip in with a forward-leg cut kick, a variation of the push kick that applies basically the same principles but in a sideways motion. Make sure your kicking leg moves first and your supporting leg slides forward immediately afterward.
When he throws the roundhouse, there comes a point when he’s full-bodied. It lasts only a moment — until he turns his back into the kick more fully and incorporates his upper-body power. That, Park says, is precisely what the push kick or cut kick can help you exploit.
“If you cut off his roundhouse with a kick as powerful as a push kick, your opponent is likely to be off-balance,” he says. “As he moves backward [from] the impact, perpetuate his motion by throwing an immediate back kick off your other leg.”
The key to making the push kick effective lies in raising the knee and driving the foot forward using a piston-like motion, the author says.
Yeon Hwan Park claims the push kick can wreak havoc on a poor puncher. To illustrate, face your partner in closed cover with your right side back. As he lunges forward and changes sides to effect a lunge punch, thrust out a push kick. Distancing and timing are essential in this drill.
To practice the crucial timing aspect of the push kick, Park suggests squaring off with a partner in closed cover. He throws a back hook kick, which you avoid by sliding backward but remaining within kicking range. Once his leg touches the ground — most people land after spinning 270 degrees, thus partly exposing their upper body — let loose with a rear-leg push kick. Your task becomes easier because his momentum moves him backward. Since you change sides during a push kick, be sure to change your guard, as well. Otherwise, your head could be exposed to attack.
To practice an offensive push kick, face your opponent in open cover. Take one quick step forward and change sides, and as he retreats, he changes sides, as well. Once he moves back, thrust in your rear-leg push kick. This drill will help you get a sense of the kick’s forward motion and a better understanding of timing and distance.
When you practice your push kick, don’t forget the footwork. If you can kick well but are unable to get within reach of your opponent, Park says, your kicks have only aesthetic value. Learning how to step to facilitate your kicks takes time, and learning to combine stepping and kicking can take longer. For this reason, Park advises students to step with their kicks immediately after they develop an understanding of the basics of both skills.
“Try to step faster than your opponent,” Yeon Hwan Park says. This way, you will be able to land your push kick before he settles back into a stance.
“Footwork is very important for all your kicks, but especially for one like the push kick, which you can just throw out of nowhere. For example, many competitors have very fast roundhouse kicks, which they can throw without having to set them up. For the push kick, though, you must create a situation wherein you can move forward safely and not extraordinarily fast.”
The push kick combines speed with power, Park says. “It’s slower than a roundhouse kick but more powerful. It’s less powerful than a side kick but faster. It doesn’t require a great deal of strength, but it does take practice.” In years to come, Park predicts we’ll see even more intricate ways to score with the technique.
by Jeff Leibowitz   August 14, 2015
(Photos by Rick Hustead)
Jeff Leibowitz is a New York-based free-lance writer and martial artist who has studied taekwondo under Y.H. Park for more than 30 years.

Black Belt Magazine

Friday, August 11, 2017

Why Some Jujitsu Control Techniques Do Not Always Work — and How to Fix Them!

Why Some Jujitsu Control Techniques Do Not Always Work — and How to Fix Them!
SCENARIO NO. 1: An assailant grabs your lapel, and you work halfway through a wrist-lock takedown you learned years ago. Then you discover that you cannot finish the technique because he’s resisting.
SCENARIO NO. 2: You’re a police officer attempting to apply a koga come-along technique on a suspect. You’ve got it set, but when you try to make him step backward, you lose control.
SCENARIO NO. 3: An assailant lashes out at you, and you manage to avoid his blows and partially restrain him with a wrist-press arm lock. A few seconds later, you can no longer control him because he’s fighting back.
The control techniques described in these scenarios are designed to force an assailant to cooperate to avoid additional pain. All are legitimate moves that work most of the time — but not all the time. How can you tell if one of them is not working before it’s too late? How can you figure out what needs to be corrected? How can you avoid these problems in the first place?
Depending on who you are and how you’re built, you have several options if a control technique doesn’t work. You can try make it work by using brute force, but that can fail — especially if your assailant is stronger than you are. You can release the hold and try to subdue him another way, but that frequently proves to be an even poorer choice. If you’re a cop, you can escalate the situation to a higher level of force based on the suspect’s noncompliance, but you may end up with a lot of explaining and paperwork to do.
If you’ve trained in jujitsu or another martial art that teaches an awarenessof how the nervous and muscular systems work, you know that a number of better options exist. All of them involve pain.
Are you ready to start your education in combatives self-defense for both empty-hand attacks and weapons attacks? Check out Kelly McCann’s introductory course! Go here to sign up.
Jujitsu practitioners know that pain and injury are two different things. They also know that controlling the level of pain can be a powerful incentive for securing an assailant’s cooperation before any substantial injury is inflicted. Of course, injuring him can end the confrontation, but when it doesn’t, it can make it difficult, if not impossible, to control him because you no longer control his level of pain.
When you apply the wrist-lock takedown, the koga come-along and the wrist-press arm lock, you’re using pain to force the assailant to cooperate. However, the amount of pain you can inflict is often limited because of circumstances such as his physique and pain tolerance. Therefore, you must be able to augment the techniques if the need arises. One method for accomplishing this is to inflict pain elsewhere on the assailant’s body, but this isn’t recommended because it frequently involves abandoning the reasonably good hold you already have. To attempt a complex technique when a simple one isn’t working usually leads to complete failure. In self-defense, it pays to remember the KISS philosophy: Keep It Simple, Sensei.
A far better method for encouraging the assailant to cooperate is to increase the pain in a simple, fail-safe manner through the use of basic nerve and pressure-point techniques.
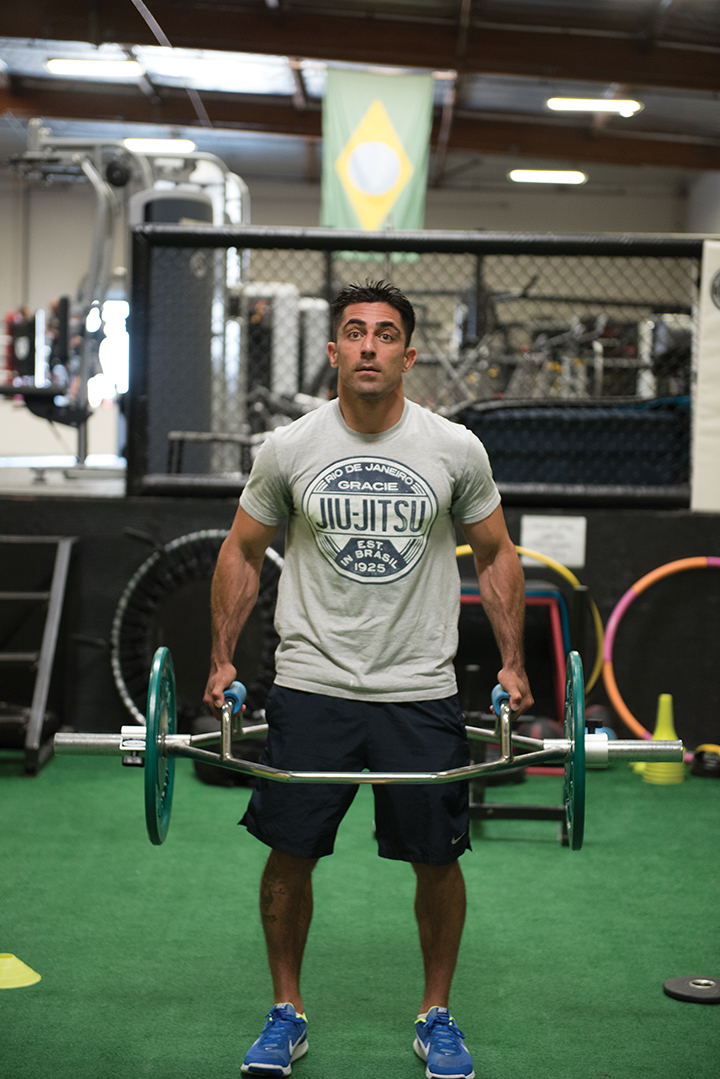
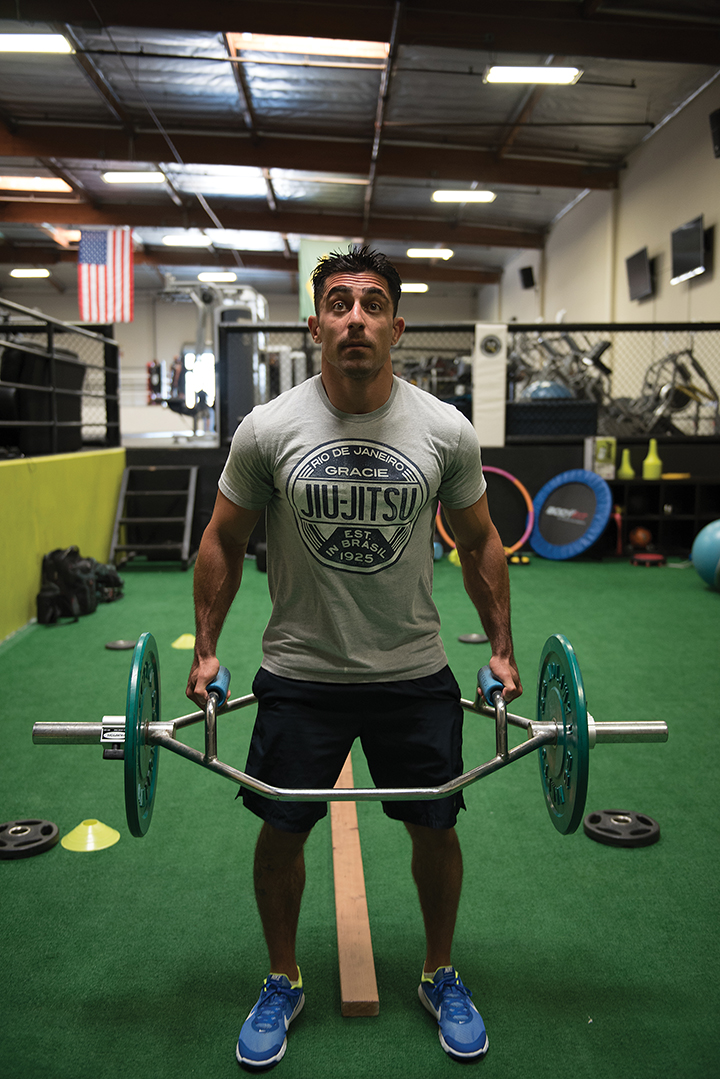
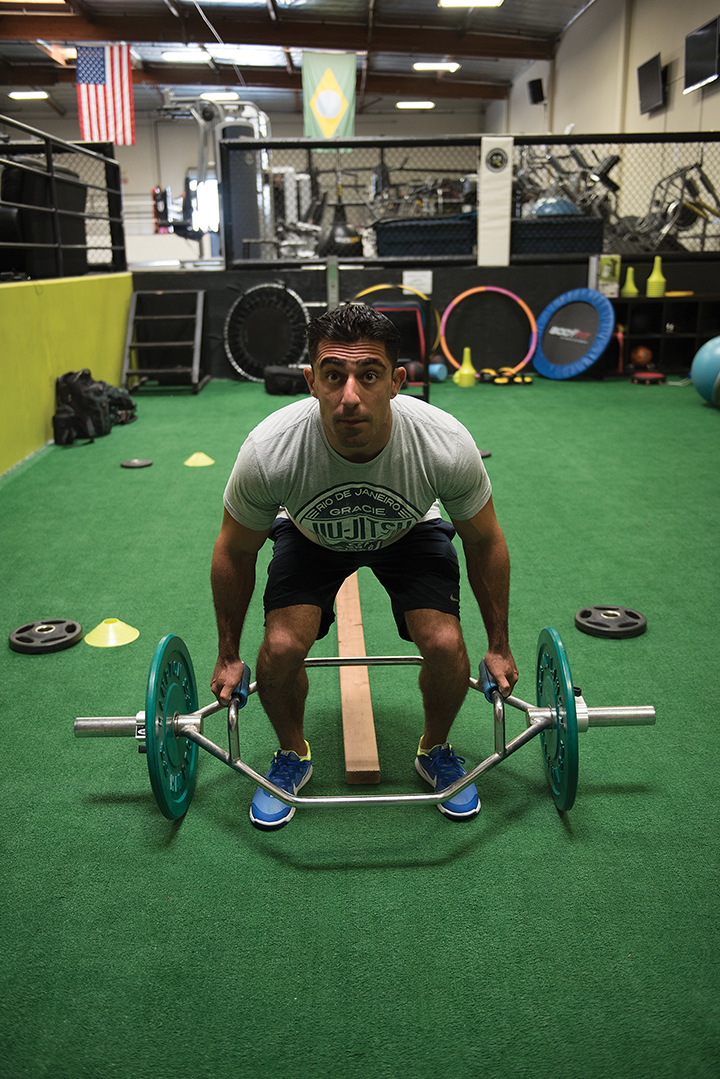
The wrist-lock takedown works well as long as the other person does not resist too much. When the assailant makes his move (1), George Kirby (left) grabs his hand (2), twists it clockwise (3) and applies pressure on the wrist to force him down (4).
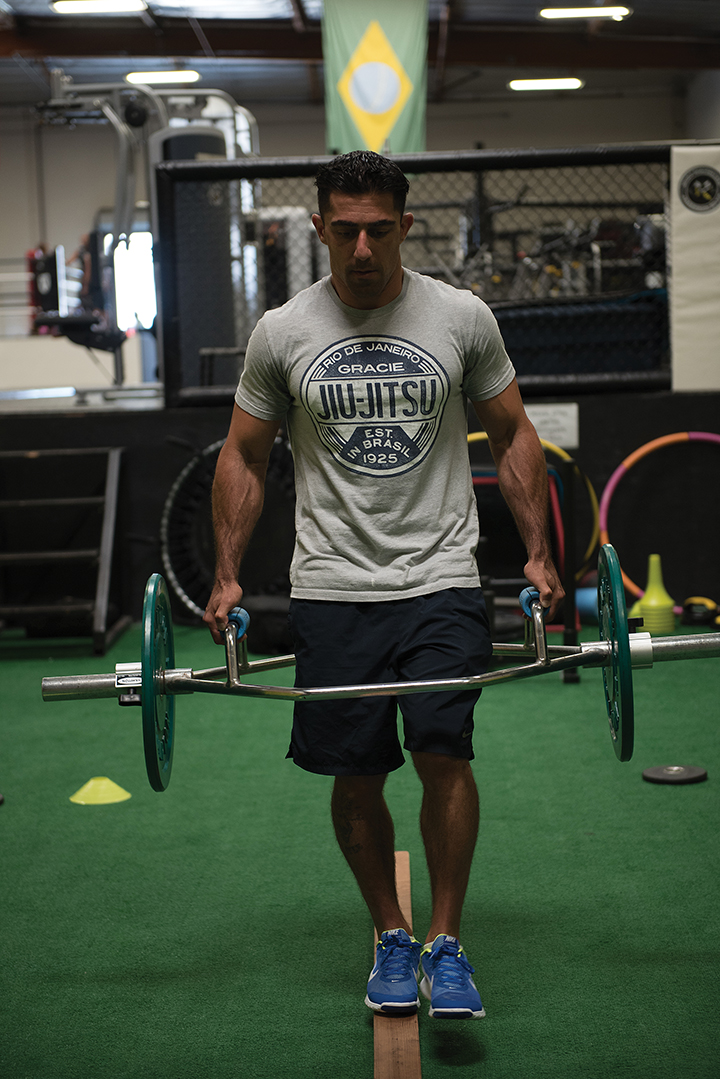
The wrist-brace takedown is a good alternative when the assailant resists the wrist-lock takedown. After George Kirby (left) is grabbed (1a), he uses his right hand to control the assailant’s right hand and places his left hand on the assailant’s forearm (2a). The pain from the wrist lock and the pressure-point technique forces the assailant to drop (3a). In detail: The ulnar nerve pressure point lies about 1 to 3 inches below the elbow (4a).
WRIST-LOCK TAKEDOWN: This move, also known as the forward wrist lock, is a simple but effective maneuver that can be used to respond to attacks that range from the simple lapel grab described in scenario No. 1 to a club attack. It’s also a very “forgiving” technique because it usually works even if it’s not done perfectly.
However, you can run into problems if the assailant resists as you turn his hand. Resistance will usually show up as his wrist reaches the halfway point — when his thumb is pointing toward the ground. The technique can come to a grinding halt at this point unless you supplement it with an additional pain-compliance method. To better acquaint yourself with this situation, practice it with special attention directed toward how the attacker’s arm rises as his wrist is turned. You’ll notice that his arm muscles — especially those on the outside of his forearm — become tight.
To bypass this obstacle, slide your left hand up to the high point of the forearm muscle. Rest your fingers on the inside of his arm about 1 to 3 inches below the elbow, then press with your middle finger. This attacks the ulnar nerve at a point where it can be easily reached. Then you can continue with the technique, which is properly called the wrist-brace takedown, or go into a variation that will force him to the ground.
The koga come-along is a popular technique that works best when both hands can be used to control the assailant and move him forward or to his left. To illustrate, George Kirby (left) blocks a punch (1-2) and traps the assailant’s arm (3). He then controls the hand (4) and completes the lock (5). However, if Kirby moves the wrong way or lets go with one hand, the assailant may be able to escape from the hold (6).
The finger-brace wrist lock is a great backup for the koga come-along. After he blocks the punch (1a-2a) and traps the arm (3a), George Kirby (left) grasps the assailant’s little finger (4a). Once he bends the appendage while locking the wrist (5a), he can lead the other man in any direction he wants (6a). Close-up of the finger lock (7a).
KOGA COME-ALONG: Also known as the wrist-lock lift, this technique can be used in a variety of situations. If properly set, it’s a strong hold with which you can maintain the compliance of most any assailant. However, the technique has two weaknesses: First, unless you have a very big hand or great physical strength, you’ll need two hands to maintain the hold. Second, it works best when you’re moving the assailant forward or to his left. If you want him to move backward or to his right, however, the hold may become compromised.
To remedy this, slide your left hand down over the back of his trapped hand, grab his little finger with your two smallest fingers, and brace your thumb against the back of his thumb at the second knuckle. You can control him by simply clenching your fist as if you’re using a hand-strengthener to build grip strength. When you move his little finger across the back of his hand — not away from it — you create an increasing amount of pain. You can easily establish the control you need to secure his cooperation or to transition into another technique.
This alternative, which is called the finger-brace wrist lock, has several advantages over the original technique. First, you can move your assailant in any direction, including up or down. Second, it’s a “low-visibility” technique, which means it’s almost impossible for a bystander to see what you’re doing. (You can even maintain the hold while your hand and the assailant’s hand are down by your side — which is great for extracting him from a crowd without attracting attention.) Third, and perhaps most important, the modified version requires only one hand to execute. In fact, once you know it well, you can actually initiate the technique using only one hand. That leaves your other hand free for other purposes — such as applying the hold on a second person if necessary.
The wrist-press arm lock allows a martial artist to easily control an assailant most of the time. To illustrate, George Kirby (right) controls the assailant’s upper arm and bends the lower portion of it behind his back (1). Then he locks the wrist to apply the pain (2).
When more security is needed to restrain a stronger assailant, the finger-brace arm lock can be used. Once George Kirby has secured the arm, he grasps the assailant’s fingers and digs into a nerve that passes through the shoulder area (1a). Then he bends the fingers until the assailant complies (2a).
WRIST-PRESS ARM LOCK: As a come-along technique, this move is effective and hard to counter. When it’s set correctly, strong resistance from the assailant can cause him to break his own wrist with no additional effort on your part. However, sometimes you need a little extra “security,” especially if you want to move him or use him as a shield against any cohorts who are still bent on getting a piece of you.
If you set the arm lock with your right hand, your left hand will be free to provide that extra security. All you have to do is rest it on the assailant’s shoulder area with your middle finger at the 9-o’clock position. If you dig into the shoulder, you’ll hit one of several nerves that pass through the area. The pain will cause him to move his left side toward you with his shoulders thrust back to reduce the pain. That makes it easier to apply the modified lock, which involves grabbing his fingers and bending them backward. He’s now off-balance, and his body can be pointed in any direction by varying the amount of pressure on the trapped arm and the nerve. If you opt to use him as a shield, you can let go with your left hand and he will still experience enough pain to possibly cause his comrades to back off.
The newest release from combatives authority Kelly McCann and Black Belt is titled Kelly McCann Combatives 2: Stick & Ground Combat. 

Controlling an assailant differs from simply throwing a kick or punch to remove yourself from a dangerous situation. You may have to restrain him to protect yourself or your loved ones — or to keep him from injuring himself while you secure the environment or find a safe place to wait for help. Consequently, whenever you use a control technique, it’s essential to give clear, loud, simple verbal commands so he knows what you want him to do. Pain transforms most people into fast learners because when they comply, the control hold becomes significantly less painful. That’s the reward for cooperation.
One of the basic rules of jujitsu is to never assume anything will work. You must always have something to back up what you’re doing — and something to back up that. A sound jujitsu program will teach you additional ways to use nerves and pressure points to augment the control techniques described above, as well as those you learn in the future.
George Kirby has taught budoshin jujitsu since 1967. The Santa Clarita, California-based instructor, who was Black Belt’s 2007 Instructor of the Year, has written a number of books about the art.

Black Belt Magazine

Thursday, August 10, 2017

Combatives history

Combatives is a term used by the United States Army for its hand-to-hand combat training program. Although the key for military personnel during missions is to never find one’s self in a situation without a rifle, sidearm or knife, sometimes a soldier has to defend himself with his fists.
Initialized by Rex Applegate during WWII and presented in his book Kill or Get Killed (1943), American combatives’ foundation lies in the close quarters combat techniques developed by British armed forces officers William E. Fairbairn and Eric A. Sykes while working for the Shanghai Municipal Police between 1907-1940. 
In 2002, Matt Larsen created the Modern Army Combatives program, which incorporates judo, escrima, boxing, muay Thai and the Brazilian jiu-jitsu. The effectiveness of combatives’ training methods come from their short, easily repeatable drills, so soldiers can rapidly learn and effectively perform combatives techniques.
Black Belt Magazine

Wednesday, August 9, 2017

How To Assess Your Full-Body Flexibility


Flexibility is a core fundamental as you continue your training not to mention as you age.

Here are five ways to check how flexible you are.


In my recent articles I’ve discussed the importance of functional flexibility for performanceand some of the common stretching pitfalls we all makeToday, I’ll go through five movements that will give you an idea of your functional flexibility in a few major areas. 

This movement list isn’t exhaustive, but it’s a great place to start. Each position focuses on a different movement pattern that you need to perform at your best. Through these movements, you might come to understand it’s your ankle mobility that is affecting your squat or your hamstring flexibility that is hindering your back position during deadlifts. You might realize that your back pain is caused by tight hip flexors and hamstrings, or that the rotation in your shoulders is limited. Understanding these limitations can help you push past them to improve position and, ultimately, performance. 

Before you dive into this test, you’ll need to warm up. Below are some suggested warm-ups which will get the body warm without altering your movement pattern in any significant way. 

  • 400m run
  • 20 standing hip circles, 10 each direction
  • 5 arm circle, each side and forwards and backwards
  • 2 minutes jump rope

  • 100 jumping jacks
  • 20 lunges, alternating
  • 10 bear crawls
  • 5 arm circle, each side and forwards and backwards
  • 50 jumping jacks

  • 250m row
  • 10 donkey kicks
  • 10 burpees
  • 10 donkey kicks
  • 250m row

Here are a few tips before you get started with the assessments.

  1. You can start with any of the movements on this list. Just make sure you test both sides.
  2. The best way to perform this test is with a friend so he or she can compare your positions to the photos below and help guide you in the right direction.
  3. For each movement, carefully follow the steps on how to properly execute the position. This will ensure a more accurate test.
  4. You may repeat each movement, holding for 30 seconds, up to 3 times. On the third attempt, you can log your results. This will allow any stiffness from previous workouts to subside.
  5. Each movement has a different set of questions for you to answer that will help guide you in a direction towards improving your mobility.
  6. If you are injured in any of the areas below, skip that movement.

Internal/External Rotation

Start seated on your shins. Grab your right elbow with your left hand and draw your elbow as far behind the back of the head as possible. Keep your right elbow where it is as you extend your left arm out to the left. Turn your thumb down and begin to reach around your lower back and up towards your right fingers. If touching your right finger tips is not possible, reset and grab a strap or band and start the process over again, this time holding onto the strap with your right hand. This will give you something to grab onto once you reach your left arm around. 

shoulder internal and external rotation
[All photos courtesy Stephanie Ring]

  1. Are you able to grab your finger tips?
  2. Where do you feel this the most? In your triceps or the front of your left shoulder?
  3. Is there any pain? If so, where?
  4. When you perform the test on the other side, do you notice a difference between the two?

Results: If you have trouble drawing your right elbow in towards the midline, you should focus on stretching your triceps and lats and using a foam roller on those areas 2-3 times a week. If drawing your left fingers up the back to reach for the right fingers is impossible or just feels tight, then the muscles of your rotator cuff are tight. You can use the movement you just performed to improve internal rotation. 

Spinal Rotation

Start on your back with your legs extended out in front. Draw your right knee into your chest. Shift your hips to the right as you draw your right knee over to the left. Extend your right arm out to the right. 

spinal rotation

  1. What are you feeling?
  2. Do you feel a stretch in the front of your shoulder or in your lower back?
  3. When you perform the test on the other side, do you notice a difference between the two?

Results: Lack of spinal rotation can mean issues for the lower back and shoulders as they pick up the slack. We want the knee to get to ground, even if the shoulder lifts up. You will want to focus your attention on stretches that encourage twisting and extension like the one you just performed and on positions like upward-facing dog, which encourage spinal extension. 

Hamstring

Start on your back. Wrap a band or strap around the arch of your right foot and extend your leg. Keep your arms long and your shoulders relaxed. Drive your right heel up as you draw your shin towards your face. 

hamstring flexibility

  1. Can you straighten your leg?
  2. Is your leg vertical to your hips?
  3. When you perform the test on the other side, do you notice a difference between the two?

Results: If your leg is not stacked vertically over the hip and at the same time your shin is not close to your face, you will need to spend time stretching your hamstrings, not just through static stretching but dynamic stretching as well. Movements like good morningsinchworm, and bear crawls will encourage functional hamstring mobility and serve as a great warm up to almost any workout. 

Hip Flexor

Step your right foot forward and drop your back knee to the ground. Press down into your right big toe and hug your outer right hip in towards the midline. Soften your hips down. 

hip flexor mobility

  1. Where do you feel this stretch?
  2. Does it look as though there is a straight line from the bottom of the front knee to the top of the back knee, as seen in the photo?
  3. When you perform the test on the other side, do you notice a difference between the two?

Results: This is a test of feel. Most athletes carry tightness in their hip flexors because of a combination of training and sitting. So regardless, always try to work the hip flexors into your new stretching routine. Stretches like this one are a great place to start. 

Ankle

Step your right foot forward and drop your back knee to the ground. Lay your torso on your thigh and scoot your back knee forward to allow your right knee to move forward of your right toes. Keep your right heel down. This test is best done without shoes. 

ankle mobility

  1. Can you get your front knee beyond the plane of your front toes?
  2. Does the heel immediately come off the ground?
  3. Do you feel a bigger stretch in your calf or your Achilles?
  4. When you perform the test on the other side, do you notice a difference between the two?

Results: Ankle mobility is a large factor in improper squat mechanics. It is helpful to know where you’re feeling the tightness. If you feel a deep stretch in the calf muscle, then foam rolling and calf stretches post workout are recommended. If your ankle feels stuck, then you will want to focus on banded distraction stretches and stretching your ankles like the movement above. 

Now Keep It Up

Now that you have a better understanding of your mobility and flexibility in these key areas, it's time to do something about it. Check back in a few weeks for an article with stretches for these major issues. In the mean time, stretch well, stretch often and with purpose. 

Coach
CrossFit, Yoga, Gymnastics

Tuesday, August 8, 2017

Grips and Hips


Don't let the title fool you the article is full of information to help you before a "stronger" martial artist - especially grip strength and "time under tension".

I am personally going to add the "time under tension" to my "carry" days workouts.


Grips and hips may sound catchy, but it is the methodology and approach of strength and conditioning for coach Mike Saffaie who happens to work with some of the top athletes in combat sports. A brown belt himself under Rener and Ryron Gracie, Mike incorporates this “grips and hips” philosophy to his own workout program as well.
Mike says that the importance of grips and hips in jiu-jitsu comes from the basic element of our art, which is to grab and control our opponent to manipulate their weight and position. One way to maximize this ability is to condition the prime muscle groups most important in accomplishing this feat.
In this article, Mike infuses some of the actual grips that you would use in a grappling match and that you wouldn’t find in your traditional workout program. By incorporating balance exercises, bodyweight movements, and bands, Mike is able to focus on the core essentials that increase performance in jiu-jitsu along with everyday function.
Static vs Explosive
According to Mike, a common error in people’s approach towards training is that there’s an imbalance towards explosive workouts in the athletic community without recognizing the importance of the “time under tension” concept. Time under tension is the idea of holding weight for certain amounts of time to assist in the development of muscle endurance. Whether it be static positions for a specified amount of time, or carrying additional weight to and from identified locations, time under tension exercises are vital to an athlete’s gains in strength.
The Workout
The following exercises can be done as individual sets (Indicated in each description) or as a combined circuit. You can also incorporate any of them into your own routine. 
Hex-Bar Balance Beam Farmer-Walk
This exercise uses a hex-bar with “Fat Gripz” attachments. A hex-bar help keep the body mechanically aligned with the weight throughout the entire movement. The “Fat Gripz” create added challenge and places an emphasis on grip development. This exercise helps improve muscle development and athletic performance by incorporating the challenge of balancing weight and combining whole body movement in moving the weight. Doing this activates use of the core due to the constant adjustment of weight distribution in the act of balancing.  Also, covering distance while balancing in a restricted area tends to slow movement, aiding in the “time under tension” concept. For this demonstration, we used a 2”x4”x10’ for our balance beam.
Step 1
Starting with feet shoulder width apart, squat down to pick up the hex-bar using either a “monkey grip” or standard grip (using the thumb), slightly roll shoulders back, head up (like you’re defending a guillotine grip), lift.
 
Step 2
Keeping your balance, step on the beam and walk to the end. Step off of the beam.
 
Step 3
While still holding the weight, perform 5 squats, paying attention to form and keeping the head up.
 
Step 4
Rotate 180 clockwise and repeat.
Perform this exercise for 4-5 sets of 5 repetitions, never letting go of the hex-bar throughout the exercise.
Note: Each time you rotate at the end of your walk, alternate between a clockwise and counterclockwise direction for your rotation.
Additional Notes:  Mike like to use a Hex-Bar because of the anatomically correct position it puts the weights being lifted in relation to the posture of the person lifting, which decreases the risk of injury.
For more exercises and tips from Mike Saffaie, be sure to grab Jiu Jitsu Magazine issue 52.

Monday, August 7, 2017

Help your teen discover martial arts


Teens who take martial arts discover they have more to offer than they thought. Martial arts builds character - give your teen a chance to discover more - Marty Martin Karate. 850-785-2024