There are several ways to apply an effective guillotine, I show you how to use the collar choke in Fight Skills 2.
https://martymartinkarate.com/fight-skills-2-overview/
https://martymartinkarate.com/fight-skills-2-overview/

The following clip is from my Fight Skills 2 Course available at the link below.
Add to your martial skills with these effective techniques.
Improve your fight skills with the material in my Fight Skills 2 course.

Butterfly Strike
Using the “Butterfly Strike” to the kidneys is the key move in the Crumbling Statue technique. First, when done properly it’s a very painful strike as the target is the kidney. Second, the reaction you get from the strike sets up options for additional strikes, takedowns or submissions. All demonstrated in Fight Skills 2.
Figure 4 Lock and Takedown
Pickup where the #9 arm-bar leaves off with the “Figure 4” position which further stresses your opponent’s arm, disrupts their balance and gives you a strong control position. I will walk you through how to use the figure 4 as a takedown and submission lock in the Fight Skills 2 course.
Now available Fight Skills 2

Bow Sweep Takedown from Knee
This sweep is very simple to execute. As your attacker goes down you follow directly into the side control position. I will show you several follow-ups in the “modified side control” lesson in my Fight Skills 2 Course.
Improve your fight skills with the material in my Fight Skills 2 course

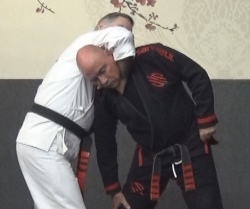
Double-hand Rear Collar Takedown
Disrupting your attackers balance from behind as in this two-hand rear collar takedown is effective for street fighting. You throw your opponent onto their stomach opening up a whole set of rear finishes. That’s the focus of the “Crumbing Statue” takedown and ground work in Fight Skills 2.
Cross Collar Guillotine Choke
There are lots of ways to apply the Guillotine. This clip from my Fight Skills 2 Course shows how you can set the choke with the opponent’s collar. This might happen if your hand slips into the collar when you are sliding your hand around the opponent’s neck to setup the choke.
Improve your fight skills with the material in my Fight Skills 2 course.

#9 Armbar
Using leverage, as in this arm-bar over the shoulder; causes pain, disrupts balance and can be used to setup takedowns. In Fight Skills 2 I show how to use the #9 arm bar to setup the “figure 4” takedown.
Continue where my first Fight Skills course left off...

Ridgehand photo
Ridge-hands in karate are especially effective strikes. Additionally, the effect of the strike offers a great way to cause a reaction which you can move to a Jiu Jitsu submission. I show you how to use the ridge hand in my Fight Skills 2 series.
Collar and Chin Lift Choke video
This clip is from the butterfly to rear finishing moves lesson, here I share how to control the collar and setup the chin lift choke position. You will learn more in the Crumbling Statue lessons in Fight Skills 2 Course.

Quick clip using arm triangle on ground after defending a punch from your guard. Keep it simple fast and effective. This is in my Fight Skills 1 package at https://martymartinkarate.com

Choke Defense on Ground. Learning to to defend chokes is just part of my fight skills material. For complete details preview this program at Marty Martin Karate. Below is a video clip from Fight Skills 1.
Guillotine Escape on the Ground