
Finger Tape
By
Posted on Dec 15, 2015
You may have seen some guys at your school tape their fingers before class, or watched Jiu-jitsu stars like Michael Langhi and Andre do battle with a grip full of tape. Have you ever wondered why these guys tape their hands and how to do it correctly? This guide will shed some light on the reasons why we tape our fingers before training and will offer a few methods on how to tape properly. Finger taping is not rocket science, but there are some useful tips and tricks to help you get maximum benefit from your efforts. The last thing we want is a tape job that doesn’t provide support or falls off within the first five minutes of class. Before we learn how to tape, let’s look at why we tape.
Why Tape?
Protect Injuries
It is most common for athletes to tape their fingers when they are injured. Whether the fingers are slightly sprained or recovering from a full-on fracture, taping helps to support, stabilize, and minimize movement of the taped finger. Typically, when you injure a finger, it’s painful to move it in a specific direction, like bending it forward for example. Placing tape around and on the backside of the injured joint via “X-Taping” (which we will cover) will prevent it from bending forward, thus limiting pain. In the case of pain from lateral, or side-to-side, finger movement, taping two fingers together via “Buddy Taping” will provide for maximum stability of a finger and limit its individual movement. So, taping can help you brace a new injury, minimize aggravation to an old chronic injury, and overall, aid in the healing of an injured finger.
It is most common for athletes to tape their fingers when they are injured. Whether the fingers are slightly sprained or recovering from a full-on fracture, taping helps to support, stabilize, and minimize movement of the taped finger. Typically, when you injure a finger, it’s painful to move it in a specific direction, like bending it forward for example. Placing tape around and on the backside of the injured joint via “X-Taping” (which we will cover) will prevent it from bending forward, thus limiting pain. In the case of pain from lateral, or side-to-side, finger movement, taping two fingers together via “Buddy Taping” will provide for maximum stability of a finger and limit its individual movement. So, taping can help you brace a new injury, minimize aggravation to an old chronic injury, and overall, aid in the healing of an injured finger.
Prevent Injuries
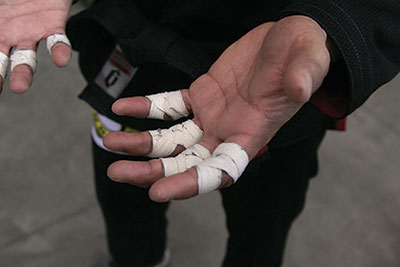
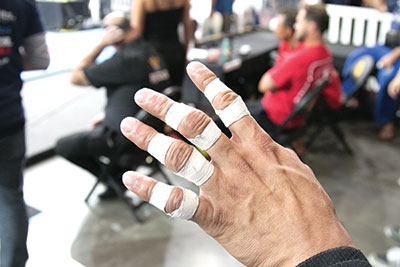
If you’re serious about grappling, then chances are you train frequently and have inevitably twisted, bent, or bruised a finger or two. Mangled fingers are as common as cauliflower ears in our sport, so if you’re planning on rolling for a while, it’s best to take care of your fingers. This is where taping comes in. You might see some guys who only tape a finger or two before training, but once in a while you’ll catch a guy who’s got every digit wrapped up. Normally, this is to protect the fingers from injury. Taping, as mentioned above, can provide heavy restriction for injured joints, but can also, depending on how you tape, give mild support to aid in injury prevention.
If you’re serious about grappling, then chances are you train frequently and have inevitably twisted, bent, or bruised a finger or two. Mangled fingers are as common as cauliflower ears in our sport, so if you’re planning on rolling for a while, it’s best to take care of your fingers. This is where taping comes in. You might see some guys who only tape a finger or two before training, but once in a while you’ll catch a guy who’s got every digit wrapped up. Normally, this is to protect the fingers from injury. Taping, as mentioned above, can provide heavy restriction for injured joints, but can also, depending on how you tape, give mild support to aid in injury prevention.
Grip
Although less merit has been given to taping for improved grip strength, some athletes believe taping their hands and fingers aids in their gripping abilities. No scientific evidence has proven an improvement in grip strength via taping, however tape does provide friction, which can help with your grip. This may be useful, especially in no gi training when friction is limited. However, taping for improved grip ultimately comes down to personal feel and preference.
Although less merit has been given to taping for improved grip strength, some athletes believe taping their hands and fingers aids in their gripping abilities. No scientific evidence has proven an improvement in grip strength via taping, however tape does provide friction, which can help with your grip. This may be useful, especially in no gi training when friction is limited. However, taping for improved grip ultimately comes down to personal feel and preference.
What You Need
The best tape for jiu-jitsu is adhesive, non-elastic sports tape, which can be purchased at your local sporting goods store, pharmacy, or online. Rolls can be bought in different widths like ½”, 1”, 1½”, etc. For taping the fingers, it’s best to use ½” or smaller. Some athletes like to buy larger width rolls so they can use the tape on other larger joints, like the wrist and ankle, and cut the tape down to ¼” or ½” for taping the fingers. A pair of scissors also makes things easier, but is not necessary.
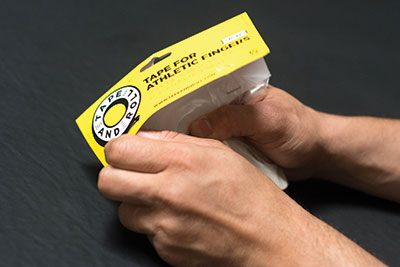
Tape and Roll is a tape brand made specifically for finger taping.
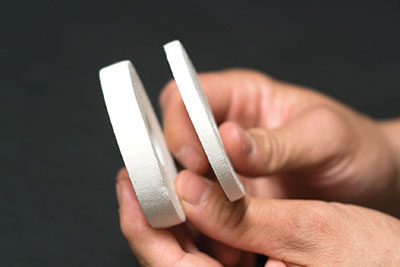
Tape and Roll offers tape in 1/2 and 1/4 inch widths.
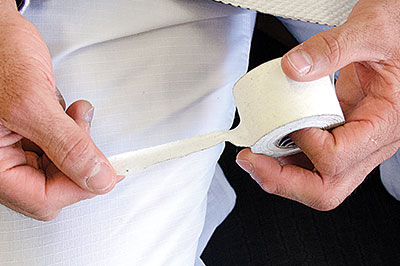
You can also use a larger width tape and tear off the width you need
How To Tape
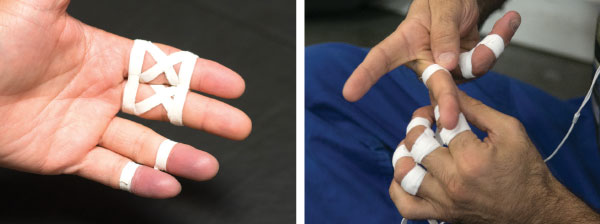
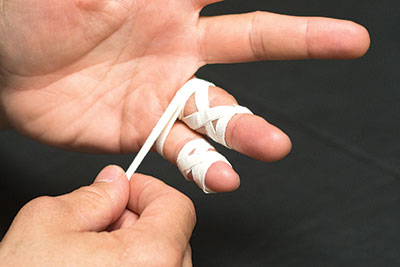
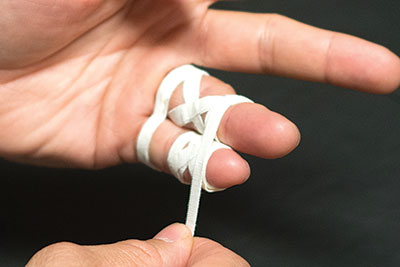
X-Taping
For: Minor sprains, achy fingers, injury prevention, added grip
X-taping is a commonly used method that helps with a variety of issues. This method involves creating an “X” over the injured joint to help support and brace the area. You can create the “X” on the front, back, or sides of the joint in order to restrict the range of motion to a specific direction. You can also create multiple “X’s” to the front and back or both sides of a joint for extra reinforcement.
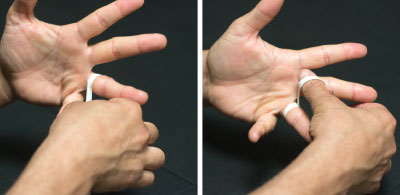
Start by creating an anchor below the affected joint by circling the tape 2 or 3 times around your finger.
Next, bring the tape up, crossing over the affected joint and create an anchor on top by circling around again 2 or 3 times above the joint.
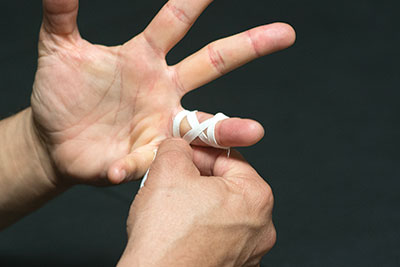
Next, bring the tape down, crossing again over the joint and creating the “X” over the other piece of tape.
Wrap around the anchor again and repeat the sequence one or two more times, depending on how much support you want.
For injured fingers, repeat this on any affected joints. You can do X-taping on either the main, larger joint or the smaller one near the tip of the finger.
For injury prevention and improved grip, repeat this on all of your fingers.
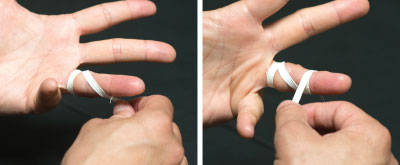
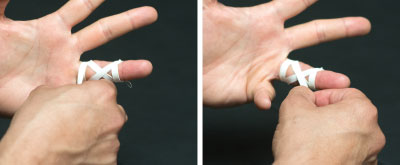
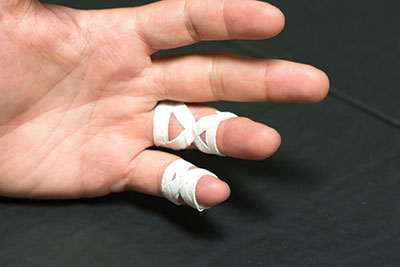
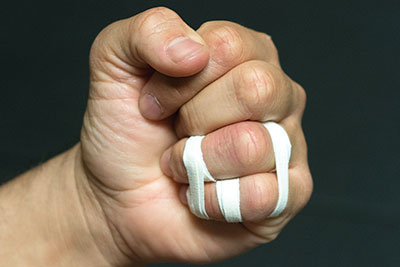
Buddy Taping
For: Sprains, Injuries
Buddy taping is another style that is used to restrict the movement of a specific finger that is injured. This is commonly used with sprains and/or after a severe injury, like a fracture. Buddy taping specifically limits lateral finger movement, however it can be combined with X-taping to provide support and movement restriction based on your needs. For example, if it’s painful to move a finger side to side, as well as to bend it forward, you could first X-tape the injured finger with the X on the back side of the joint, then buddy tape the injured finger to the finger next to it.
Buddy taping is another style that is used to restrict the movement of a specific finger that is injured. This is commonly used with sprains and/or after a severe injury, like a fracture. Buddy taping specifically limits lateral finger movement, however it can be combined with X-taping to provide support and movement restriction based on your needs. For example, if it’s painful to move a finger side to side, as well as to bend it forward, you could first X-tape the injured finger with the X on the back side of the joint, then buddy tape the injured finger to the finger next to it.
To buddy tape, start by creating an anchor on the injured finger. The anchor is used to secure the tape so it doesn’t slip off of your skin so easily.
Tape one time around, above and below the injured joint. Decide which fingers you will buddy tape to, and then, starting from the anchor, tape around both fingers 2 or 3 times.
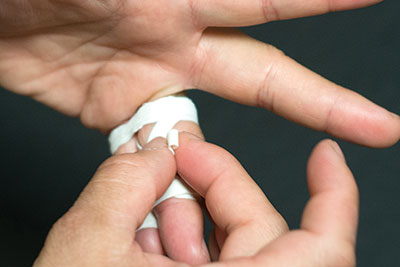
Do this above and below the joint.
If you are X-taping first, there is no need for anchors, just tape the two fingers together, above and below the joint, over the previous tape job.
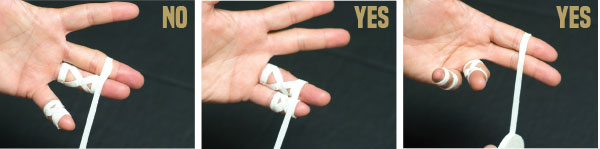
Don’t Leave A Piggy In the Cold
Piggies are usually toes but so what? When buddy taping, it’s important to think like Spock. When either your middle or ring finger needs taping whatever you do, don’t tape them together. Doing this will leave your pinky and index finger stranded and more susceptible to injury. If the ringer finger needs to be buddied up tape it to your pinky, if the middle finger needs the attention, then buddy up to your index finger.
Important Tips:
• Don’t tape too tightly as to cut off circulation. If your finger turns dark red, purple, blue, or black, quickly undo the tape and start over.

• Don’t tape too loosely as to not provide enough support. Taping regularly will develop your sense of feel and lead to a good tape job.
• Be generous with your tape, but don’t overdo it. Not enough tape will fall off quickly, but too much tape with be bulky and catch on gis and your opponent.
• These are guidelines, however, every injury is different. Experiment with different styles or combinations of taping to see what works best for you. If in doubt, contact a doctor or physical therapist.


No comments:
Post a Comment